1、跳转到文章详情页面
新建详情页面(使用自动生成方法)

image.png
1.1 注册跳转文章详情页面事件
post.wxml

image.png
1.2 跳转到文章详情页面
post.js
  onTapToDetail(event){
    wx.navigateTo({
      url: 'post-detail/post-detail',
    })
  }

image.png
2、不要在template上注册事件

image.png
template标签仅仅是一个占位符,在编译 后会被template的模板内容替换
2.1 在block上注册事件
post.wxml

image.png

image.png
2.2 增加view容器包裹template模板
post.wxml

image.png

image.png
3、页面间传递参数的3中方式
1)使用全局变量
2)使用缓存
3)通过页面导航url的query参数传递
第一个、第二个都涉及到了全局变量;下面主要介绍第三种的用法
3.1 组件的自定义属性
3.1.1 绑定postId
post.wxml

image.png

image.png
3.2 通过dataset获取组件自定义属性
3.2.1 绑定postId
post.js
onTapToDetail(event){
    var postId = event.currentTarget.dataset.postId;
    console.log(postId);
    wx.navigateTo({
      url: 'post-detail/post-detail?id='+postId,
    })
  }
- 组件自定义属性名有如下故则:
1)必须以data-开头
2)多个单词由连字符“-”连接
3)单词中最好不要有大写字母,如果有大写字母,除了第一个字母外,其余大写 字母将被转化成小写
4)在js中获取自定义属性值时,多个单词将被转换驼峰命名
- 示例如下:
data-post ================> dataset.post
data-post-id ================> dataset.postId
data-pOST-ID ================> dataset.postId
data-postId ================> dataset.postid
3.3 获取页面参数值
3.3.1 获取页面参数值
post-detail.js

g

image.png
4、编译时设置初始化页面及参数
每次保存一次都会刷新页面,回到初始化欢迎页面,如果开发的时候希望在可以直接编译到文章详情页面,可以按照下面的所示执行

image.png

image.png

image.png

image.png
5、读取文章详情数据
根据列表页面传递过来的文章Id,去缓存中获取对应的数据
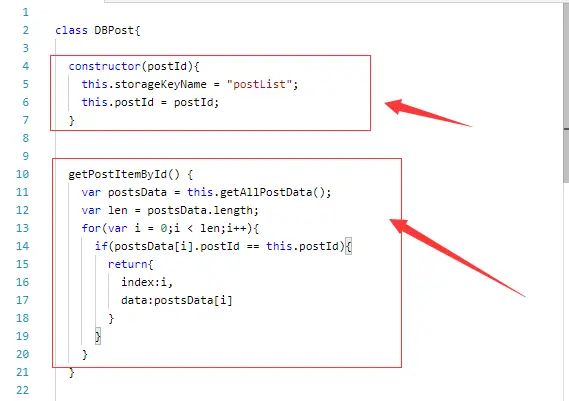
5.1 新增getPostItemById方法
DBPostl.js

image.png
5.2 获取指定id号的文章数据
post-detail.js
import { DBPost } from '../../../db/DBPost.js';

Page({

  /**
   * 页面的初始数据
   */
  data: {

  },

  /**
   * 生命周期函数--监听页面加载
   */
  onLoad: function (options) {
    var postId = options.id;
    this.dbPost = new DBPost(postId);
    this.postData = this.dbPost.getPostItemById().data;
    this.setData({
      post:this.postData
    })
  },

image.png
6、编写文章详情页面
6.1 编写详情页面骨架
post-detail.wxml
<view class='container'>
  <image class='head-image' src='{{post.postImg}}'></image>
  <text class='title'>{{post.title}}</text>
  <view class='author-date'>
    <view class='author-box'>
      <image class='avatar' src='{{post.avatar}}'></image>
      <text class='author'>{{post.author}}</text>
    </view>
    <text class='date'>{{post.dateTime}}</text>
  </view>
  <text class='detail'>{{post.detail}}</text>
</view>
6.2 编写详情页面的样式
post-detail.wxss
/* pages/post/post-detail/post-detail.wxss */

.container {
  display: flex;
  flex-direction: column;
}

.head-image {
  width: 750rpx;
  height: 460rpx;
}

.title {
  font-size: 20px;
  margin: 30rpx;
  letter-spacing: 2px;
  color: #4b556c;
}

.author-date {
  display: flex;
  flex-direction: row;
  margin-top: 15rpx;
  margin-left: 30rpx;
  align-items: center;
   justify-content: space-between;
  font-size: 13px;
}

.author-box {
  display: flex;
  flex-direction: row;
  align-items: center;
}

.avatar {
  height: 50rpx;
  width: 50rpx;
}

.author {
  font-weight: 300;
  margin-left: 20rpx;
  color: #666;
}

.date {
  color: #919191;
  margin-left: 39rpx;
}

.detail {
  color: #666;
  margin: 40rpx 22rpx 0;
  line-height: 44rpx;
  letter-spacing: 1px;
  font-size: 14px;
}

image.png
-
justify-content 属性注意点
 image.png

image.png
7、垂直居中问题的经典解决方法
7.1文字和图片垂直居中对齐
post-detail.wxss
.author-box {
  display: flex;
  flex-direction: row;
  align-items: center;
}

.avatar {
  height: 50rpx;
  width: 50rpx;
}

.author {
  font-weight: 300;
  margin-left: 20rpx;
  color: #666;
}

image.png
小程序对应flex的支持相当完善,建议多使用flex进行元素布局
8、动态设置导航栏标题
8.1 使用配置文件配置导航栏标题
8.1.1 配置全局导航栏文字
app.json
  "window": {
    "navigationBarBackgroundColor": "#4A6141",
    "navigationBarTextStyle": "white",
    "navigationBarTitleText": "标 题"
  }
运行之后可以看到,所有的页面的导航栏都增加了“标题”,这俩个子,这不是我们想要的,我们一般希望在不同的页面显示不同标题

image.png
8.1.2 配置当个页面导航栏文字
post.json
{
  "navigationBarTextStyle": "white",
  "navigationBarTitleText": "标 题"
}
这样,导航栏文字只会在post页面中出现
8.2 使用wx.setNavigationBarTitle(OBJECT)设置导航条
8.2.1 动态设置导航栏文字
post-detail.js
  /**
   * 生命周期函数--监听页面初次渲染完成
   */
  onReady: function () {
    wx.setNavigationBarTitle({
      title:this.postData.title
    })
  },
在122100版本之前,在onShow方法设置,会出现一闪而过的情况,官方建议:对界面的设置,如wx.setNavigationBarTitle请在onReady之后设置
但是在130400版本之后,不会出现这个问题,因此要时常关注开发文档的说明